Best Sourdough Discard Bagels Recipe: Transform Your Discard Into Golden, Chewy Perfection 🥯🔥✨
1. Introduction
If you’re a sourdough enthusiast looking for creative ways to use your discard, you’re in for a treat with this Best Sourdough Discard Bagels Recipe! These homemade bagels boast that perfect chewy texture and tangy flavor that will make you swear off store-bought versions forever. Whether you’re an experienced baker or just starting your sourdough journey, this recipe is designed for success.

What makes these bagels special is how they transform what would normally be discarded into something truly extraordinary. The sourdough starter adds incredible depth of flavor while helping reduce food waste – a win-win for any home baker. These bagels are incredibly versatile – perfect for breakfast sandwiches, avocado toast, or simply enjoyed with cream cheese and your favorite jam.
While the process might seem intimidating at first glance, we’ve broken it down into simple, foolproof steps. Many bakers find that once they try homemade bagels, especially using their sourdough discard, they never go back to store-bought. The satisfaction of pulling these golden beauties from your oven is worth every minute of effort!
2. Ingredients
One of the beauties of this recipe is its simplicity. You likely have most of these ingredients already in your pantry:
- 1 cup (240g) sourdough discard – Use your unfed starter straight from the fridge for best results
- 3 ½ cups (420g) bread flour – The high protein content creates that perfect chewy texture
- 1 ½ teaspoons (9g) salt – Enhances flavor and controls yeast activity
- 1 tablespoon (12g) sugar – Feeds the yeast and helps with browning
- 1 cup (240ml) warm water – About 100°F (38°C) to activate the starter
- 1 tablespoon (15ml) honey – For the boiling water to create that signature shiny crust
- Optional toppings: sesame seeds, poppy seeds, everything bagel seasoning, dried garlic or onion
Pro Tip: For an extra flavor boost, consider adding a teaspoon of malt powder to the dough or using malt syrup in the boiling water instead of honey. This is what many professional bakeries use for that authentic bagel flavor!
3. Equipment Needed
You don’t need fancy equipment to make amazing bagels, but having these tools will make the process easier:
- Large mixing bowl – For combining ingredients and initial fermentation
- Stand mixer with dough hook (optional) – Makes kneading easier but not essential
- Baking sheets – Preferably half-sheet pans for even baking
- Parchment paper – Prevents sticking and makes cleanup easier
- Slotted spoon – For safely transferring bagels in and out of boiling water
- Large pot for boiling – A Dutch oven works great for maintaining water temperature
- Kitchen scale (highly recommended) – For precise measurements that lead to consistent results
If you’re enjoying this sourdough discard recipe, you might also love our Cinnamon Roll Cake or Hawaiian Roll French Toast for other creative breakfast ideas!
Step 1: Mixing the Dough
Begin by combining all your dry ingredients in a large mixing bowl or the bowl of your stand mixer. Add the sourdough discard and warm water, then mix until a shaggy dough forms. This initial mixing can be done with a wooden spoon or the paddle attachment of your mixer.

If using a stand mixer, switch to the dough hook and knead for 8-10 minutes on medium speed. The dough should become smooth and elastic, cleaning the sides of the bowl. For hand kneading, turn the dough out onto a lightly floured surface and knead for 10-12 minutes using the heel of your hand to push the dough away from you, then folding it back over itself.
Dough Consistency Check: The dough should be firm but still slightly tacky. It should pass the “windowpane test” – when you stretch a small piece between your fingers, it should stretch thin enough to see light through it without tearing immediately. If it’s too sticky, add flour 1 tablespoon at a time. If too dry, add water 1 teaspoon at a time.
Step 2: First Rise
Place your kneaded dough in a lightly oiled bowl, turning once to coat all surfaces. This prevents a skin from forming on the dough. Cover with a damp towel, beeswax wrap, or plastic wrap to prevent drying out.

Let the dough rise at room temperature (about 70°F/21°C) for 4-6 hours. The exact time will depend on your kitchen temperature and the activity of your starter. The dough should nearly double in size and feel puffy when gently pressed.
Overnight Option: For enhanced flavor development, you can refrigerate the dough overnight (8-12 hours). This slow fermentation allows the sourdough to work its magic, developing more complex flavors. The cold temperature also makes the dough easier to handle when shaping. If you choose this method, let the dough come to room temperature for about an hour before shaping.
While your dough is rising, why not explore some other delicious recipes like our Alabama Firecrackers or other appetizer ideas to serve alongside your fresh bagels?
Step 3: Shaping the Bagels
Turn the risen dough out onto a very lightly floured surface. Using a bench scraper or sharp knife, divide the dough into 8 equal portions (about 100g each for consistent baking). We recommend weighing the portions for uniformity.

To shape each bagel:
- Take one portion and cup your hand over it, rolling in small circles on an unfloured surface to create tension on the surface
- Once you have a smooth ball, flatten slightly with your palm
- Poke your thumb through the center to create a hole
- Gently stretch the hole to about 2 inches in diameter (it will shrink back during proofing)
- Place shaped bagels on a parchment-lined baking sheet, leaving about 2 inches between them
Alternative Shaping Method: Some bakers prefer to roll each portion into a rope about 8 inches long, then wrap it around their hand and roll the ends together to seal. Both methods work well – choose what feels most comfortable to you!
Step 4: Second Rise and Boiling
Let the shaped bagels rest for 30-45 minutes while you prepare for boiling. During this time, they’ll puff up slightly but won’t double in size like regular bread dough. Meanwhile, preheat your oven to 425°F (220°C) and bring a large pot of water to boil (about 4 quarts).

When the water reaches a rolling boil, add the honey (or malt syrup if using). Reduce heat to maintain a gentle boil. Working with 2-3 bagels at a time (don’t overcrowd the pot), boil each bagel for 1 minute per side. Use your slotted spoon to gently flip them.
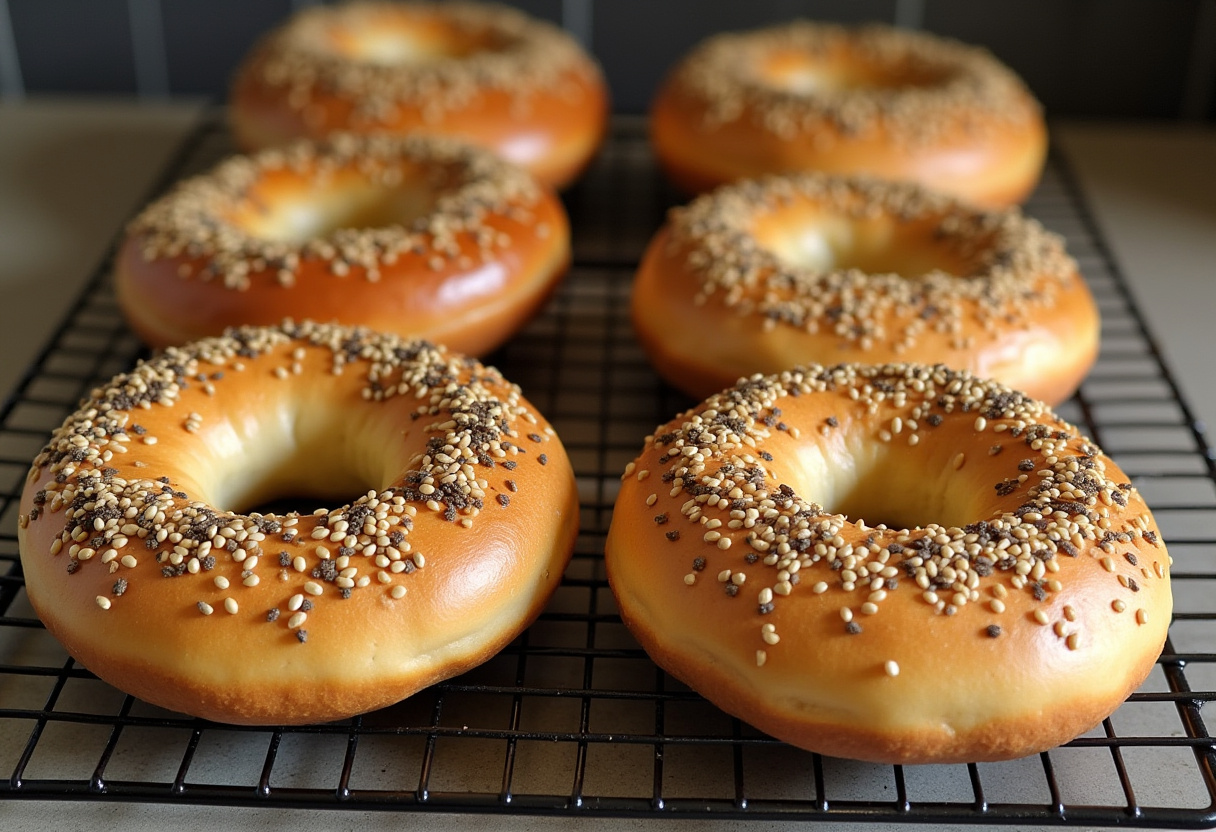
After boiling, transfer the bagels back to the parchment-lined baking sheet. While the surface is still wet and sticky, this is the perfect time to add your toppings. For seeds, you can press them gently to ensure they adhere well. For a shiny finish, you can brush with an egg wash (1 egg beaten with 1 tablespoon water) before adding toppings.
Boiling Science: This step is what gives bagels their distinctive chewy texture. The boiling gelatinizes the starches on the surface, creating a barrier that prevents the bagels from rising too much in the oven, resulting in that dense, chewy crumb we love. The honey in the water helps create a shiny crust.
For more inspiration on creative toppings, check out our Balsamic Blackberry Grilled Cheese or dessert recipes that would pair beautifully with these bagels!
5. Baking Instructions
Bake the boiled bagels in your preheated oven for 20-25 minutes until they’re deeply golden brown. Rotate the baking sheet halfway through for even browning. If you’re baking two sheets at once, swap their positions in the oven at the halfway mark.
The bagels are done when they sound hollow when tapped on the bottom and register at least 190°F (88°C) internally if you want to check with an instant-read thermometer. Let them cool on a wire rack for at least 15 minutes before slicing – this allows the crumb to set properly.
Baking Variations:
- For extra crispness, bake at 450°F (232°C) for 15-18 minutes
- For softer bagels, reduce temperature to 375°F (190°C) and bake 22-25 minutes
- For steam baking (professional bakery style), place a pan of boiling water in the bottom of your oven during baking
Looking for other baked goods to try? Our Banana Pudding Rice Krispie Treats and Cinnamon Roll Honeybun Cheesecake are reader favorites!
6. Storage Tips
Freshly baked bagels are best enjoyed the same day, but here’s how to keep them tasting great:
- Room Temperature: Store in a paper bag for up to 2 days (plastic makes them soggy)
- Freezing: Slice before freezing and store in an airtight container for up to 3 months
- Refreshing: Toast frozen bagels directly – no need to thaw first
- Day-Old Bagels: Make excellent bagel chips or bread pudding
Pro Tip: If you want to enjoy fresh bagels throughout the week, you can prepare the dough up through shaping, then refrigerate the shaped bagels overnight. In the morning, boil and bake them fresh – they’ll taste like you just made them!
7. Recipe Variations
Once you’ve mastered the basic recipe, try these delicious variations:
- Everything Bagels: Coat with everything bagel seasoning before baking (try making your own with sesame seeds, poppy seeds, dried garlic, dried onion, and salt)
- Cinnamon Raisin: Add 1 tsp cinnamon to the dry ingredients and knead in ½ cup raisins after the initial mix
- Whole Wheat: Substitute 1 cup bread flour with whole wheat flour for a nuttier flavor (may need slightly more water)
- Cheese Bagels: Top with shredded cheddar during the last 5 minutes of baking
- Blueberry: Gently fold in 1 cup dried blueberries (fresh will make the dough too wet)
- Pretzel Bagels: Add 1/4 cup baking soda to the boiling water for that pretzel-like crust
For more creative recipe ideas, explore our chicken recipes that would make excellent bagel sandwich fillings!
8. Troubleshooting Common Issues
Even experienced bakers encounter challenges sometimes. Here are solutions to common problems:
- Dense Bagels? Your dough may need more kneading or a longer rise time. The gluten might not have developed enough.
- Bagels too flat? The dough might be too wet – add a bit more flour next time. Also, make sure your starter is active but not overly acidic.
- Not chewy enough? Make sure to boil for the full time and bake until deeply golden. The boiling step is crucial for texture.
- Stick to parchment? Use a light spray of oil on the paper before placing dough, or try a silicone baking mat.
- Uneven browning? Rotate your baking sheet halfway through baking and consider using convection if your oven has it.
- Holes closing up? Make the center hole larger than you think it needs to be – it will shrink during proofing and baking.
For more sourdough inspiration, check out this excellent resource from This Jess with additional tips and variations!
9. Conclusion
This Best Sourdough Discard Bagels Recipe truly transforms what might have been wasted into golden, chewy masterpieces. With their perfect crust and tangy flavor, these homemade bagels will become your new breakfast obsession. The process is surprisingly simple once you understand the steps, and the results are infinitely better than anything you can buy.
Remember that baking is both a science and an art – don’t be discouraged if your first batch isn’t perfect. Each time you make these bagels, you’ll learn more about the dough’s behavior and how to adjust for your specific kitchen conditions. Many bakers find that the more they make bagels, the more intuitive the process becomes.
We’d love to hear about your bagel-making adventures! What variations did you try? What tips worked best in your kitchen? Share your experiences in the comments below. And if you’re looking for more ways to use your sourdough discard, stay tuned for more creative recipes coming soon!
Happy baking, and enjoy the delicious fruits (or rather, bagels) of your labor!

Best Sourdough Discard Bagels Recipe
- Total Time: 55 minutes (plus rising time)
Description
Transform your sourdough discard into golden, chewy perfection with this Best Sourdough Discard Bagels Recipe. These homemade bagels boast the perfect texture and tangy flavor, making them far superior to store-bought versions. Ideal for breakfast sandwiches, avocado toast, or simply enjoyed with cream cheese, this recipe helps reduce food waste while delivering professional-quality results every time!
Ingredients
- 1 cup (240g) sourdough discard (unfed starter)
- 3 ½ cups (420g) bread flour
- 1 ½ teaspoons (9g) salt
- 1 tablespoon (12g) sugar
- 1 cup (240ml) warm water
- 1 tablespoon (15ml) honey (for boiling water)
- Optional toppings: sesame seeds, poppy seeds, everything bagel seasoning
Instructions
- Mix sourdough discard, flour, salt, sugar, and water to form a shaggy dough. Knead for 8-10 minutes until smooth and elastic.
- Let dough rise at room temperature for 4-6 hours or refrigerate overnight for enhanced flavor.
- Divide dough into 8 equal portions, shape into balls, and create holes in the center to form bagels.
- Let shaped bagels rest 30-45 minutes while preheating oven to 425°F (220°C).
- Boil each bagel for 1 minute per side in honey-water mixture, then transfer to baking sheet.
- Sprinkle with desired toppings and bake for 20-25 minutes until deeply golden brown.
- Cool on wire rack for 15 minutes before slicing and serving.
Notes
- For extra shine, brush bagels with egg wash before baking.
- Store at room temperature for 2-3 days or freeze for up to 3 months.
- Try variations like everything bagel seasoning, cinnamon raisin, or cheese toppings.
- If dough is too sticky, add a bit more flour during kneading.
- For chewier texture, extend boiling time to 2 minutes per side.
- Prep Time: 30 minutes
- Cook Time: 25 minutes
Nutrition
- Serving Size: 1 bagel
- Calories: 245 Kcal
- Sugar: 3g
- Sodium: 440mg
- Fat: 1g
- Saturated Fat: 0.2g
- Unsaturated Fat: 0.6g
- Trans Fat: 0g
- Carbohydrates: 50g
- Fiber: 2g
- Protein: 8g
- Cholesterol: 0mg
Keywords: sourdough discard bagels, homemade bagels, sourdough bagel recipe, easy bagel recipe, no waste sourdough, chewy bagels, breakfast recipes, bread baking